Windows Installation Guide
Supported versions
The following Windows versions are supported:
- Windows 11 (Home, Pro, Enterprise)
- Windows 10 (Home, Pro, Enterprise)
Warning
- arm64 Windows is not supported yet.
- 32-bit Windows is not supported.
- There are compatibility issues with some Intel integrated GPUs on Windows systems. Learn more
Hypervisor
Genymotion Desktop requires an hypervisor to run the Android system. Since Genymotion Desktop 3.3, it is now possible to use VirtualBox or QEMU as hypervisor.
VirtualBox needs to be installed prior to or alongside Genymotion Desktop. You can download our installer with VirtualBox on our website , or install VirtualBox separately.
If you choose to install Genymotion without VirtualBox, but still wish to use this hypervisor, VirtualBox must be installed separately before running Genymotion. Learn More
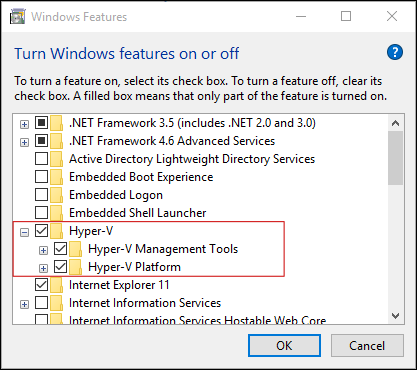
If you choose QEMU hypervisor, there is nothing to install but you need to make sure that Hyper-V is enabled:
- Search for "Turn Windows Features on or off" using Windows Search or Cortana and pick same from search results.
-
In the Turn Windows Features on or off window, verify that all the Hyper-V options - Hyper-V Management Tools and Hyper-V Platform - are enabled. If not, check them all and click
OKto apply the changes:
-
Reboot your PC when prompted.
QEMU requires Hyper-V, but it is not available with Windows Home edition by default. We recommend using VirtualBox hypervisor with this version.
However, if you still wish to use QEMU, you will need to install Hyper-V manually. You can refer to this article for more details.
Make sure to backup your Windows system before installing Hyper-V manually!
Genymotion Desktop Installation
- Run Genymotion installer for Windows:
genymotion-X.Y.Z.exeorgenymotion-X.Y.Z-vbox.exeif you wish to install Genymotion and Virtualbox alongside. - Select the setup language and click OK. By default, the Genymotion language corresponds to your system language. The Genymotion setup wizard opens. Click Next.
- Select the destination folder by clicking Browse. The default destination folder is
C:\Program Files\Genymobile\Genymotion. Then click Next. - Select the start menu folder by clicking Browse or check Don't create a Start menu folder and click Next.
- Select whether or not to create a desktop icon and click Next.
- Click Install.
- Select Restart now and click Finish to reboot your PC.