Get Started with Genymotion Desktop
![]()
![]()
Genymotion Desktop is a local Android emulator for PC and Mac.
Requirements
Genymotion Desktop should work on most modern computers, provided they meet the following minimum requirements.
Hardware
| Component | Requirement |
|---|---|
| CPU | PC: 64-bit Intel 6th generation or AMD Ryzen Mac: 64-bit Intel or Apple silicon SoC (Mac M) |
| BIOS/UEFI | PC: Intel VT-x or AMD-V/SMV capability must be enabled in the Bios/UEFI |
| Graphics | OpenGL 3.3 or higher capable video card* |
| RAM Memory | 16GB or more |
| Display resolution | 1920x1080 or higher |
| Free HD space | 300MB for Genymotion + 2GB minimum per virtual devices |
*There are compatibility issues with some Intel integrated GPUs on Windows. Learn more.
Rosetta must be enabled on Mac M series.
Operating Systems
Warning
- Virtual environments such as Virtual Machines, VPS or Docker are not supported. Learn more
- Servers are not supported. Learn more
The following OSes are supported:
-
Windows (x86_64)
Supported versions:
- Windows 11
-
macOS (x86_64, arm64)
Supported versions:
- macOS 26 (Tahoe)
- macOS 15 (Sequoia)
-
Linux (x86_64)
Supported distributions:
- Ubuntu 24.04LTS (Noble Numbar)
- Debian Stable (13, Trixie)
- Fedora Workstation 43
Windows Installation Guide
Windows Servers, Virtual Machines, VPS (Virtual Private Servers) and Docker are NOT supported!
There are compatibility issues with some Intel integrated GPUs (iGPU) on Windows systems. Learn more
Windows Pro or Enterprise editions are highly recommended.
Genymotion Desktop for Windows arm64 is not available at this time, but it will be in the future.
Genymotion Desktop requires an hypervisor to run the Android system.
You can choose between VirtualBox (recommended) and QEMU:
VirtualBox needs to be installed alongside Genymotion Desktop, but to make things easier, it is included with our full installer for Windows from our website .
Hyper-V incompatibility
Genymotion does not work well with VirtualBox hypervisor when Hyper-V is enabled: you may get "The VirtualBox DHCP server has not assigned an IP address to the virtual device" errors, extremely long booting time and sluggish performance. To fix this, you will need to completely disable Hyper-V when using Genymotion.
You can find detailed instructions in our FAQ: How to completely disable Hyper-V?.
If you choose to only install Genymotion, but still wish to use VirtualBox hypervisor, you must install it separately before running Genymotion. Learn more
QEMU hypervisor on Windows is still experimental and not recommended for the moment.
If you choose QEMU hypervisor, there is nothing to install but you need to make sure that Hyper-V is enabled:
- Search for "Turn Windows Features on or off" using Windows Search or Cortana and pick same from search results.
-
In the Turn Windows Features on or off window, verify that all the Hyper-V options - Hyper-V Management Tools and Hyper-V Platform - are enabled. If not, check them all and click
OKto apply the changes: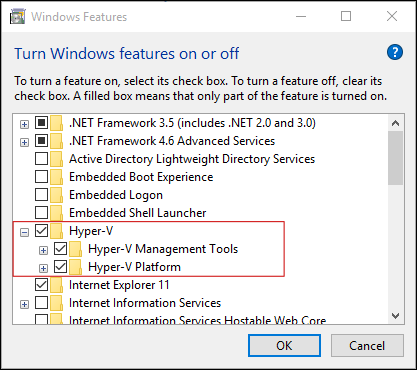
-
Reboot your PC when prompted.
QEMU requires Hyper-V, but it is not available with Windows Home edition by default. We recommend using VirtualBox hypervisor with this version.
However, if you still wish to use QEMU, you will need to install Hyper-V manually. You can refer to this article for more details.
Make sure to backup your Windows system before installing Hyper-V manually!
To install Genymotion Desktop on Windows, follow these steps:
- Run Genymotion installer for Windows:
genymotion-X.Y.Z-vbox.exe(orgenymotion-X.Y.Z.exeif you wish to upgrade or install Genymotion without VirtualBox). - Select the setup language and click OK. By default, the Genymotion language corresponds to your system language. The Genymotion setup wizard opens. Click Next.
- Select the destination folder by clicking Browse. The default destination folder is
C:\Program Files\Genymobile\Genymotion. Then click Next. - Select the start menu folder by clicking Browse or check Don't create a Start menu folder and click Next.
- Select whether or not to create a desktop icon and click Next.
- Click Install.
- Select Restart now and click Finish to reboot your PC.
macOS Installation Guide
Rosetta must be enabled on mac M series. Learn more
Genymotion Desktop requires an hypervisor to run the Android system.
Genymotion Desktop works as-is with an embedded QEMU hypervisor which uses Hypervisor, there is no need to install any extra software.
Using VirtualBox hypervisor on macOS is not recommended, and only available on old mac with Intel x86_64 CPU.
VirtualBox is not included in our DMG package and needs to be installed prior to Genymotion Desktop:
- Download VirtualBox DMG package for macOS (Intel only). Learn more
- Install VirtualBox.
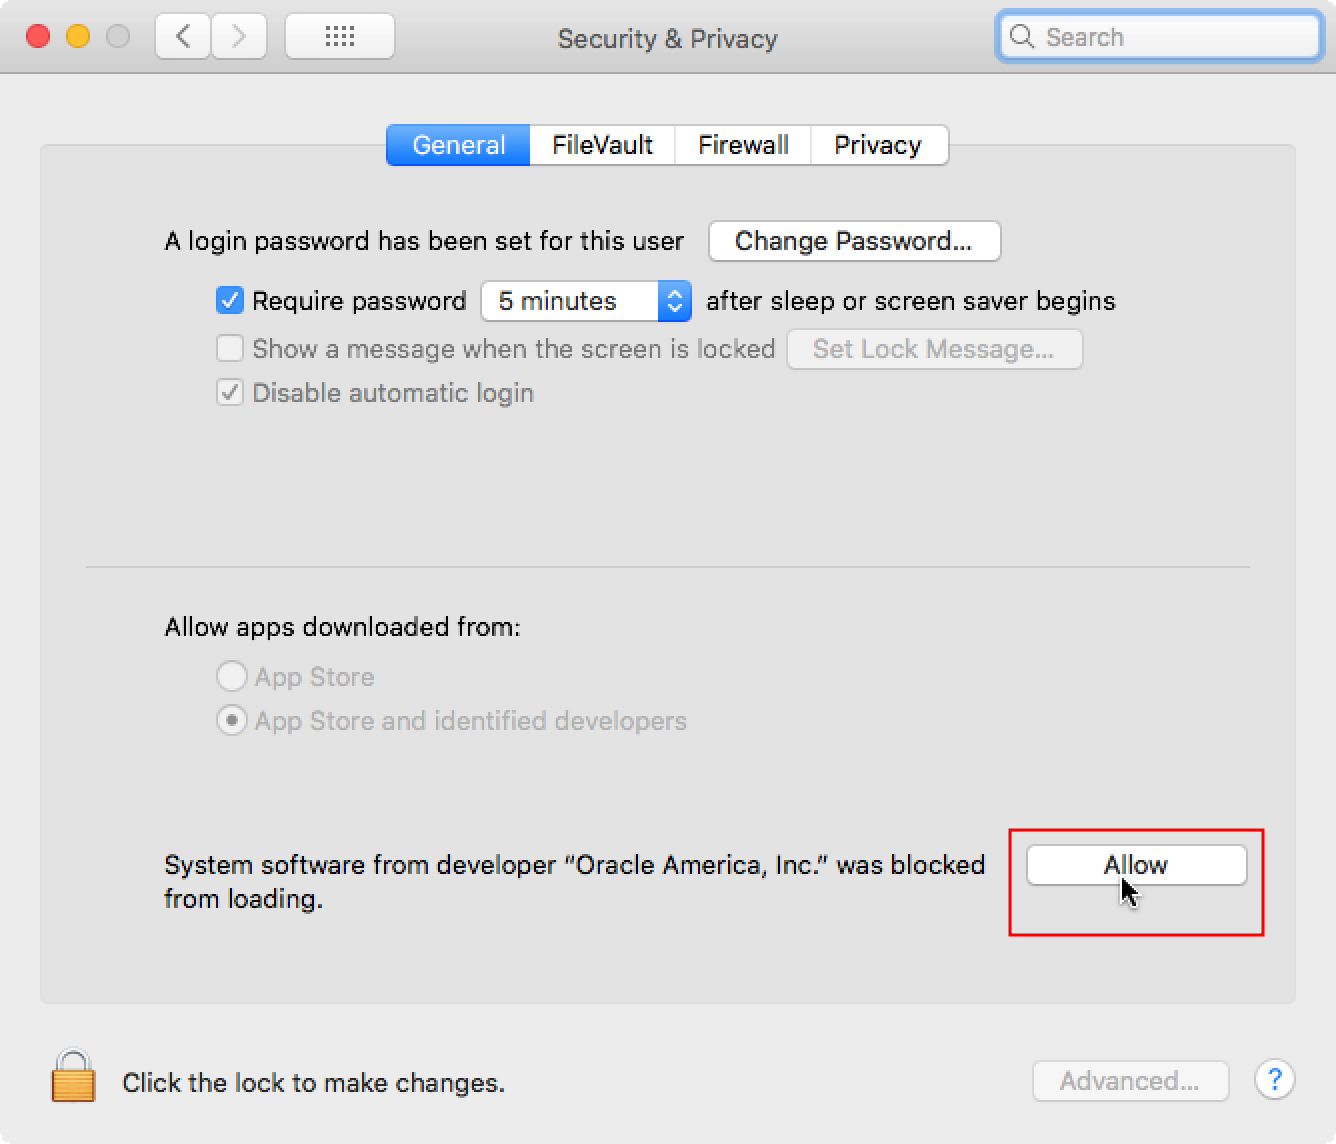
-
Go to macOS System Preferences > Security & Privacy > General, and click the Allow button:
If you get an error when launching Genymotion Desktop, reboot your Mac.
To install Genymotion Desktop on macOS, follow these steps:
- Open the genymotion-X.Y.Z.dmg package.
- Drag and drop Genymotion and Genymotion Shell to the Applications directory.
Linux Installation Guide
Only Ubuntu LTS, Debian Stable and Fedora Workstation distributions are officially supported.
Only Gnome, KDE and MATE desktop environments are fully supported. Genymotion Desktop may not work correctly, or at all, with other desktop environments.
Genymotion Desktop is only available for x86_64/amd64 for the moment.
Genymotion Desktop may crash on X11 session in Ubuntu; we recommend using Wayland instead.
Genymotion Desktop requires an hypervisor to run the Android system.
Genymotion Desktop works as-is with an embedded QEMU hypervisor which uses KVM which is installed by default on our supported distributions, there is no need to install any extra software.
Using VirtualBox on Linux is not recommended and only maintained for retro compatibility.
The Genymotion installer does not include VirtualBox, so it has to be installed separately. To do so, you can follow these instructions:
There are known issues with VirtualBox and kernel 6.14 from Ubuntu 24.04.3LTS. We strongly advise to use QEMU instead.
- Download VirtualBox 7.0.26 .deb package for Ubuntu 24.04
-
Perform a global update and reboot:
sudo apt update && sudo apt upgrade && sudo reboot -
Install the downloaded package:
sudo apt install ./virtualbox-7.0_7.0.26-168464~Ubuntu~noble_amd64.debPress Y and press ENTER to confirm. VirtualBox dependency packages are being downloaded and installed. It may take a while to complete.
Secure Boot
If Secure Boot is enabled on your host machine, VirtualBox installer will try to sign its kernel modules during installation and you will need to set a password to your Secure Boot. A full reboot of your system is mandatory to apply the change after installation.
You will then be prompted at startup by Secure Boot to input the password you set.
-
Add your user to the vboxusers group:
sudo usermod -a -G vboxusers $USER -
Reboot your PC.
To verify your installation, run the following commands in a terminal:
groups | grep vboxusers
If this command does not return anything, then your user account is not in the vboxusers group. To solve this, run sudo usermod -a -G vboxusers $USER, then log out and in again - or reboot your PC.
Next, verify that VirtualBox kernel modules are properly installed and working:
lsmod | grep -i vbox
If successful, it should return the following:
$ lsmod | grep -i vbox
vboxnetadp             28672  0
vboxnetflt             28672  0
vboxdrv               524288  2 vboxnetadp,vboxnetflt
If not, try to force VirtualBox kernel modules compilation:
sudo vboxconfig
And reboot your PC.
Please refer to VirtualBox wiki for detailed instructions.
Secure Boot
If Secure Boot is enabled on your host machine, VirtualBox installer will try to sign its kernel modules during installation and you will need to set a password to your Secure Boot. A full reboot of your system is mandatory to apply the change after installation.
You will then be prompted at startup by Secure Boot to input the password you set.
Please refer to this article for detailed instructions.
Secure Boot
If Secure Boot is enabled on your host machine, VirtualBox installer will try to sign its kernel modules during installation and you will need to set a password to your Secure Boot. A full reboot of your system is mandatory to apply the change after installation.
You will then be prompted at startup by Secure Boot to input the password you set.
To install Genymotion Desktop on Linux, follow these steps:
-
Open a terminal and move to your home Download folder1:
cd ~/Download -
Give run permission to the Genymotion installer
.runfile:chmod +x genymotion-X.Y.Z-linux_x64.run -
Run the installer.
PATHis the install target path2:./genymotion-X.Y.Z-linux_x64.run -d PATH
Global installation (not recommended)
It is possible to install Genymotion globally with the sudo command:
sudo ./genymotion-X.Y.Z-linux_x64.run
This will install Genymotion in /opt/genymotion, however we do not recommend this as it may cause issues due to access permissions.
Quickstart Guide
To start using Genymotion Desktop and run your Android application in a virtual device, follow the steps below.
Sign in
Launch Genymotion Desktop:
Click ![]() from Windows Application menu or desktop.
from Windows Application menu or desktop.
Click ![]() from the Applications directory.
from the Applications directory.
Click ![]() Genymotion from your distribution Application Launcher, or in a terminal:
Genymotion from your distribution Application Launcher, or in a terminal:
$ ~/genymotion/genymotion
If you installed Genymotion in a specific directory, replace ~/genymotion/ by your Genymotion installation path; or, if you installed it globally (with sudo), replace ~/genymotion/ by /opt/.
At first start, Genymotion Desktop will require you to log in:

If you already have a Genymotion account, enter your credentials and click NEXT. Otherwise, click on CREATE ACCOUNT to create a new Genymotion account.
If you already have a Genymotion SaaS Cloud account, you can log in using this account. Please note that SSO is not supported yet; this will only work if you have set a password. For more information, please refer to Get Started with Genymotion SaaS
If your host machine network uses a proxy, click View proxy options and set your Proxy type, hostname, port and authentication.
Next, you will be redirected to the Usage panel:

There, you need to select:
- I have a license: if you have a paid license to activate Genymotion Desktop Pro edition. See How to use register a license for more information.
- I use Genymotion SaaS: to sign in with your Genymotion SaaS Cloud account. This is recommended if you wish to use the new Cloud instance in Genymotion Desktop feature.
- Personal use: to use Genymotion Desktop free edition with limited feature and no technical support. Please refer to Genymotion legal terms and conditions for more information.
Read the Terms & Conditions carefully and check I understand and agree to the Terms & Conditions:

Click NEXT:

Create a new device
Click CREATE to open the device installation wizard:

From there, you can navigate to the various tabs to configure your new device:
- Summary: You can view and change the name of your device, the Android image and Hardware profile in this section.
-
Android image: This is where you select the Android image to use with your device.

If you upgraded from a previous version, you can click REFRESH to force an update of the available Android images.
-
Hardware profile: In this section, you can choose the hardware profile for your device.

If you upgraded from a previous version, you can click REFRESH to force an update of the available Hardware profiles.
-
System: In this section, you can configure various settings for the device:
- Hardware: set your device hardware specifications (nomber of processors, RAM, VM Heap Size )
- Permissions: enable root access. For more details about Root toggle, please refer to Root access feature.
- Input options: Toggle Android navigation bar and virtual keyboard.

-
Display: In this section, you can set various settings to control the device display.
- Primary display: set your device resolution and definition and dpi. You can use our predefined settings, or set a custom resolution.
-
Advanced display options: select Normal for a standard device, or Multi-Display if you wish to emulate a device with multiple displays.
The Multi-Display feature is still experimental.
-
Options: set rounded corner radius and content padding, to simulate a real device dislpay with rounded corners.
- Window style: run the device in a window (default), in full-screen, or with a skin. For more details, please refer to Virtual Device settings
- Advanced: force the OpenGL ES maximum API version (default is
3.1).

-
Hypervisor options:
If you use QEMU Hypervisor (see Genymotion settings), you can toggle quick boot feature in the Hypervisor options tab:

Quick boot may cause various boot and stability issues, leave it disabled if unsure.
If you use VirtualBox Hypervisor (see Genymotion settings), you can set the NAT (default) or Bridge hypervisor network mode in the Hypervisor options tab:

Click INSTALL to start the device deployment. Your virtual device is being downloaded and will appear in the dashboard:

If the virtual device deployment fails at this point, you may be running out of free space.
For more details about Virtual Device settings, please refer to this page.
Launch a device
Click , or double click, on your newly created virtual device to start it:
