Get Started with Genymotion PaaS
![]()
![]()
Genymotion PaaS is our solution to run Genymotion on Cloud platforms. It is currently available on:
- Amazon Web Services (AWS)
- Google Cloud Platform (GCP)
- Alibaba Cloud (Alibaba)
- Microsoft Azure (Azure)
Requirements
Genymotion PaaS has been tested on the following browsers:
| Browser | Min. Version |
|---|---|
| Google Chrome | 85 |
| Mozilla Firefox | 78 |
| Microsoft Edge | 20.10240 |
| Safari* | 11 |
| Opera | 70 |
* The device display may not appear with Safari 18 and higher. Mac users should use Google Chrome instead.
Network security settings
To enable communication from your host(s) to your instance, you need to set or update your security groups/firewall to allow inbound connections from your local network (inbound).
You can use the following inbound rules to allow access with balanced security:
| Service | Protocol | Port(s) | Source | Destination |
|---|---|---|---|---|
| HTTPS/WSS | TCP | 443 | Any / Authorized hosts | Any |
| HTTP | TCP | 80 | Any / Authorized hosts | Any |
| ADB* | TCP | 5555 | Authorized hosts only! | Any |
| SSH | TCP | 22 | Authorized hosts only! | Any |
| WebRTC (TCP)** | TCP | 51000-51100 | Any / Authorized hosts | Any |
| WebRTC (UDP)** | UDP | 51000-51100 | Any / Authorized hosts | Any |
*ADB connections are neither secured nor authenticated; you should ONLY allow this port to authorized sources! If you wish a safer way to connect a device to ADB, you can use an SSH tunnel instead of allowing TCP port 5555.
**Allowing WebRTC is optional, but recommended for better performance.
Get Started
Available Android Images
Genymotion PaaS is available for all regions, except China.
Data is encrypted using Android encryption on Android 8.0 images and above. There is no data encryption with Android 5.1, 6.0 and 7.0 images.
We offer ARM64 and x86_64 images with the following Android versions:
- 16.0
- 15.0
- 14.0 Automotive OS (beta)
- 14.0
- 13.0
- 12.1
- 12.0
- 11.0
- 10.0
- 9.0 Pie
- 8.0 Oreo
- 7.0 Nougat
- 11.0
- 10.0
- 9.0 Pie
- 8.1 Oreo
- 8.0 Oreo
- 6.0 Marshmallow
- 5.1 Lollipop
We offer ARM64 and x86_64 images with the following Android versions:
- 16.0
- 15.0
- 14.0
- 13.0
- 12.1
- 12.0
- 11.0
- 10.0
- 9.0 Pie
- 8.1 Oreo
- 8.0 Oreo
- 7.0 Nougat
- 6.0 Marshmallow
- 5.1 Lollipop
We offer ARM64 and x86_64 images with the following Android versions:
- 16.0
- 15.0
- 14.0
- 13.0
- 12.1
- 12.0
- 11.0
- 10.0
- 9.0 Pie
- 8.0 Oreo
- 7.0 Nougat
- 11.0
We offer ARM64 and x86_64 images for the following Android versions:
- 16.0
- 15.0
- 14.0 Automotive OS (beta)
- 14.0
- 13.0
- 12.1
- 12.0
- 11.0
- 10.0
- 9.0 Pie
- 8.1 Oreo
- 8.0 Oreo
- 7.0 Nougat
- 6.0 Marshmallow
- 5.1 Lollipop
Create and launch an instance
- Go to AWS Marketplace
- Select the version of Android OS and architecture (
x86_64orarm64) for your Genymotion instance. -
In the EC2 Instance Type section, select an instance corresponding to your needs. You can refer to the table below to know which instance to select depending on the architecture and your use case:
c6g.mediumarm instance type is incompatible and not available for Android 10+ images.c6gis recommended overm6gbecause ARM64 instances need less RAM than x86_64 ones, since there is no translation layer.Usage ARM64 x86_64 Basic Android environment
Automation, monitoring, testing, no graphical interactionst4g.small t3.small Low-profile Android environment
Basic interactions, not suitable for video streaming or gamingt4g.medium t3.medium Standard Android environment
Common usage, suitable for low-res video streaming or 2D gamesc6g.large m5.large Professional Android environment
Better performance for basic video streaming and 2D gamesc6g.xlarge m5.xlarge High-end Android environment
High-res Video streaming, 3D gamesc6g.2xlarge m5.2xlarge -
Click Continue to Subscribe. Review your choices and accept terms, then click Continue to Configuration.
- Review the basic configuration and click Continue to Launch.
- EC2 Instance Type: select an instance type in accordance to your choice when subscribing (see step 4).
-
Security Group: create a new security group (Create New Based On Seller Settings) if you need specific EC2 security/firewall settings. To help you choose the best settings for you, please refer to the Requirements.
It is not recommended to use the default security group.
The EC2 Auto-assign Public IP feature is enabled by default. Make sure to setup your EC2 security group correctly to avoid any unauthorized connections to your instance.
-
In Key Pair Settings, you can select a key pair if you have already created some, or create a new one. This is recommended if you need to access the instance with SSH.
Once the initial setup is done, the instance automatically starts. It can take up to two minutes before the instance can be accessed through the web browser.
-
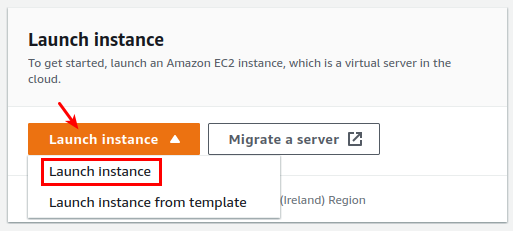
In the EC2 Dashboard, click Launch instance and select Launch instance
-
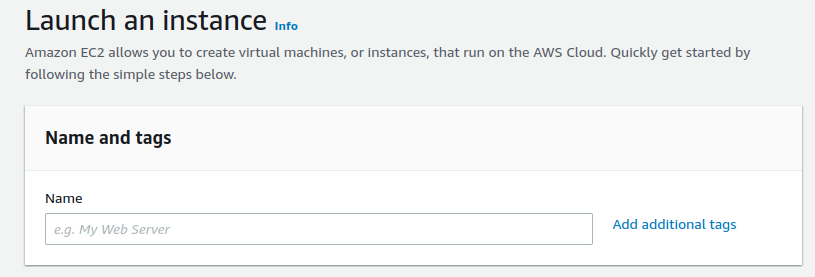
Give a name to your instance in the Name and tags field:
-
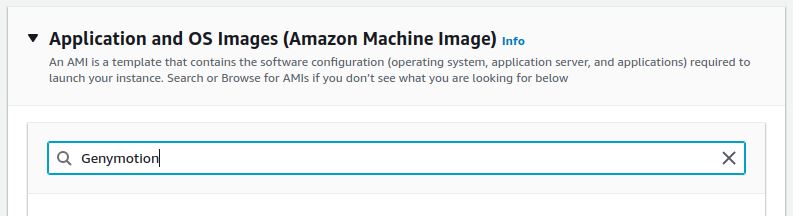
In Application and OS images (Amazon Machine Image), type "Genymotion" in the search bar and press return:
-
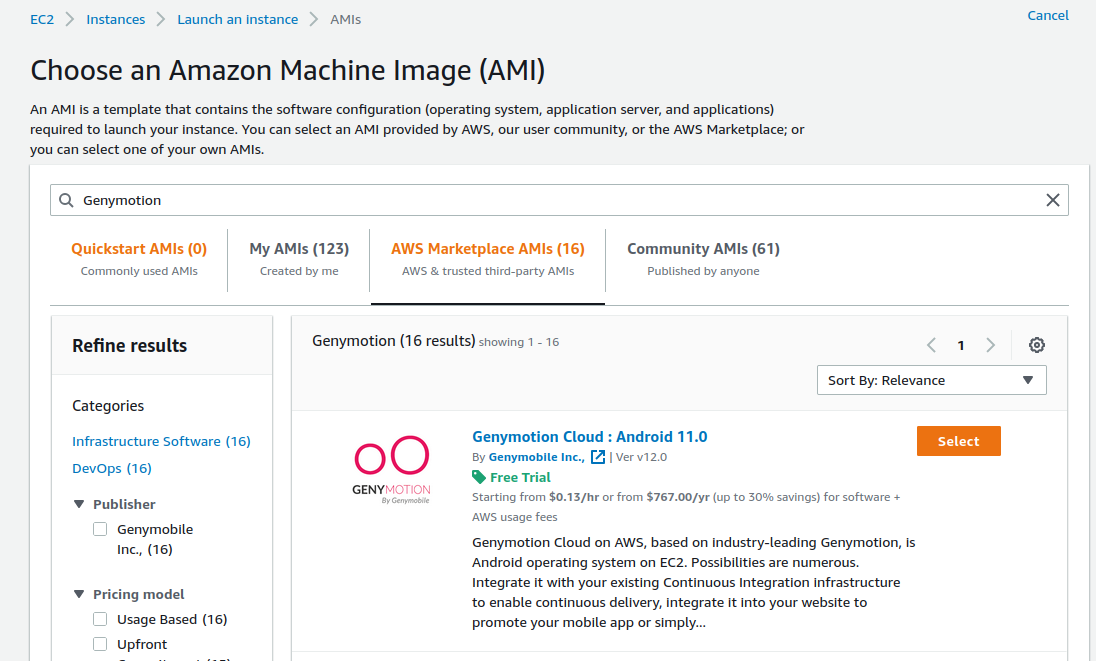
Select AWS Marketplace AMIs and choose the Genymotion image you wish to subscribe to:
-
Review the product pricing and conditions of use, and click Continue
-
Select the instance best suited to your need with the instance type drop-down button. Recommended types are:
The
t2andm4x86_64 instance types are not suitable for Genymotion.c6g.mediumarm instance type is incompatible and not available for Android 10+ images.Usage ARM64 x86_64 Basic Android environment
Automation, monitoring, testing, no graphical interactionst4g.small t3.small Low-profile Android environment
Basic interactions, not suitable for video streaming or gamingt4g.medium t3.medium Standard Android environment
Common usage, suitable for low-res video streaming or 2D gamesc6g.large m5.large Professional Android environment
Better performance for basic video streaming and 2D gamesc6g.xlarge m5.xlarge High-end Android environment
High-res Video streaming, 3D gamesc6g.2xlarge m5.2xlarge c6gis recommended overm6gbecause ARM64 instances need less RAM than x86_64 ones, since there is no translation layer. -
If you already have an SSH key pair, you can use the drop-down button in the Key pair (login) section to associate the pair with the instance, or create a new key pair.
-
In Network settings, you can either create a new security group (default), or use already existing groups.
- If you choose to create a new security group, make sure to add and setup rules required to your needs. For recommended security settings, please refer to Requirements.
-
To choose an already existing group, click Edit in the upper-right corner of the section:

The EC2 Auto-assign Public IP feature is enabled by default. Make sure to setup your EC2 security group correctly to avoid any unauthorized connections to your instance.
-
In Configure storage, you can change the internal storage size and type, or add external storage.
Advanced details
You can adjust advanced settings in this section, but we do not recommend altering them unless you are an experienced AWS user.
Click Launch instance when you are set to create and launch the new instance.
- Go to Google Cloud Platform marketplace.
- Select the version of Android OS for your Genymotion instance.
-
Click Launch:

You will then be redirected to the configuration page:

You may want or need to change a few settings before deploying the instance. Also, any incoming connection from outside the virtual network will be blocked - to connect to from the Internet, you need to set firewall tags before deploying the new instance.
- Deployment name: The name of the virtual device. You can change it to your liking.
- Zone: Select your geographical area. The zone determines what computing resources are available and where your data is stored and used.
-
Machine type: Select the machine type from the drop-down list or by clicking Customize. We recommend the following types depending on your usage:
Usage ARM64 x86_64 Basic Android environment
Automation, monitoring, testing, no graphical interactionst2a-standard-2 e2-small Low-profile Android environment
Basic interactions, not suitable for video streaming or gamest2a-standard-2 e2-medium Standard Android environment
Common usage, suitable for low-res video streaming or 2D gamesc3a-standard-4 n2-standard-2 Professional Android environment
Better performance for basic video streaming and 2D gamesc3a-standard-8 n2-standard-4 High-end Android environment
High-res Video streaming, 3D gamesc3a-standard-16 n2-standard-8 -
Boot Disk: Select the boot disk type and Storage space.
An SSD persistent disk is better for random IOPS or streaming throughput with low latency. Persistent disk performance is tied to the size of the persistent disk volume. You are charged for the actual amount of provisioned disk space.
In the Firewall/Networking section, you can change the following settings:
-
Network interfaces: Click on the default network interface to change the Network, Subnetwork and External IP to be used by the instance. This assigns the instance an IPv4 address from the subnetwork range. Instances in different subnetworks can communicate with each other using their internal IPs as long as they belong to the same network.
-
Firewall: Add firewall tags (rules) to allow specific network traffic from the Internet. For recommended firewall rules, please refer to Requirements.
- IP forwarding: Enable or Disable IP forwarding. This allows the instance to help route packets.
When done, click Deploy.
Select your image and subscription plan:
- Go to Alibaba Cloud Marketplace
- Select an image (Android version + architecture) for your Genymotion instance.
- Click Choose Your plan and proceed to select your subscription plan.
Setup your instance:
-
In Elastic Compute Service select the Custom Launch selection:

-
In Billing Method, select Pay-As-You-Go.
- In Region, select your geographical area. The zone determines what computing resources are available and where your data is stored and used.
- In Network and zone, select a VPC and a vSwitch.
In the Instance section, you need to select the Instance type that matches your image architecture (x86 or arm64) and your need:

We recommend the following instance types depending on your usage:
| Usage | ARM64 | x86_64 |
|---|---|---|
| Basic Android environment Automation, monitoring, testing, no graphical interactions |
ecs.c6r.large | ecs.s2.small |
| Low-profile Android environment Basic interactions, not suitable for video streaming or games |
ecs.g6r.large | ecs.s2.large |
| Standard Android environment Common usage, suitable for low-res video streaming or 2D games |
ecs.c6r.xlarge | ecs.s3.large |
| Professional Android environment Better performance for basic video streaming and 2D games |
ecs.g6r.xlarge | ecs.m1.medium |
| High-end Android environment High-res Video streaming, 3D games |
ecs.c6r.2xlarge | ecs.c1.large |
Available instance types may change depending on the region!
In the Image section, make sure that Marketplace Image is selected:

Setup the storage:

In the Storage section, select the System Disk type and size (default: Ultra Disk). Minimum is 40GiB.
Note
- Storage space is less expensive with Ultra Disk (default).
- SSD Cloud Disk is better for random IOPS or streaming throughput with low latency.
It is unnecessary to add a Data Disk, because it won't be used in the instance.
Bandwidths & Security Groups:

In the Public IP Address section, check Assign Public IPv4 Address to assign a public IP to your instance. Please note that without a public IP, your instance will not be reachable outside of Alicloud VPC!
In Secrity Group, select the custom Security Group you want to use. If you already have Security Groups, click Select Security Group.
Otherwise, select the New Security Group tab to create a new group. You can create a Basic Security Group with SSH, HTTPS and HTTP for basic access. Or you can use an Advanced Security Group for more refined security settings.
You can only add basic access (SSH, HTTPS, HTTP) at this point. You may need to edit your security Group later to refine your security or add more rules, such as ADB access
For details about security settings, please refer to Requirements - Network security settings.
Management:

In the Management section, you can set or create a key pair to access the instance via SSH. For more details about SSH access, please refer to Accessing an instance with SSH.
You can select Set Later to set the key pair later.
Do not use ecs-user as login username.
Finally, create and launch your instance:
Read Alibaba ECS Terms of Service and the Terms of Service carefully, check ECS Terms of Service | Terms of Service and click Create Order to get started.
You will be prompted when your instance is ready:

Once the initial setup is done, the instance automatically starts. It can take up to two minutes before the instance can be accessed through the web browser.
-
Go to MS Azure marketplace:

For an overview of the available software plans, go to the Plans + Pricing tab.
-
Click Get It Now and select a software plan and an Android image version.
-
Click Continue, review your selection and click Create:

-
In the Basics section, fill in the appropriate information:
- Subscription: Only pay-as-you-go is available at the moment.
- Resource group: Select a resource group. If you don't have any, you need to create a new one.
- Virtual machine name: Set a name to your virtual machine.
- Region: Select a region. Choose a region similar or close to your own location for best results.
- Availability options: Please refer to Availability options in Azure.
-
Security type: Set the security type to Standard.
Security type must be set to Standard, or the instance will not start!
-
Image: This is the Genymotion Device image which corresponds to the plan you chose.
- Azure spot instance: Please refer to Azure spot instance overview. Default is
No. -
Size: This is the instance type (CPU architecture, number of virtual CPUs, RAM) of your virtual machine. We recommend the following sizes depending on your usage:
Usage ARM64 x86_64 Basic Android environment
Automation, monitoring, testing, no graphical interactionsStandard_D2ps_v5 Standard_B2s Low-profile Android environment
Basic interactions, not suitable for video streaming or gamesStandard_D2ps_v5 Standard_B2s Standard Android environment
Common usage, suitable for low-res video streaming or 2D gamesStandard_D4ps_v5 Standard_D2s_v5 Professional Android environment
Better performance for basic video streaming and 2D gamesStandard_D8ps_v5 Standard_D4s_v5 High-end Android environment
High-res Video streaming, 3D gamesStandard_D16ps_v5 Standard_D8s_v5 -
Authentication type: This is the type of authentication to connect remotely to the virtual machine. Select
SSH public keyto access the instance with SSH. - Username: Set the username to
shellin order to access the virtual device with SSH. - SSH public key source: Generate a new key pair, use existing key pair in Azure or use existing public key. See Accessing instances with SSH for more details.
-
Click Next : Disks. In this section, you can change the virtual machine main storage and/or add more storage disks.
-
Click Next : Networking. There, you need to setup your VM network:
- Virtual Network: This is the VM internal (private) network. You need to select an existing virtual network or create a new one.
- Subnetwork: This is the VM virtual network subnetwork. This can be used to isolate a VM from the others or set several VMs in the same virtual network.
- Public IP: Sets a public IP to communicate inbound and outbound (without network address translation (NAT)) with the Internet and other Azure resources not connected to a virtual network.
- NIC network security group: Select Advanced to enable the Configure network security groups option.
- Configure network security groups: These are lists of Access Control List (ACL) rules that allow or deny network traffic to subnets, network interfaces, or both.
- Load balancing: You can place your virtual machine in the backend pool of an existing Azure load balancing solution.
-
Click Next : Management. This section is related to monitoring and management options for your VM. Change the settings according to your needs.
- Click Next : Advanced. These are specific options for advanced users. We are not going to detail them here.
- Click Next : tags and set tags to your VM to your liking.
- Finally, click Next : Review + create: your selections will be reviewed and your VM validated. Once validation is complete, click on Create to create the VM.
When finished, your new VM will be deployed and started. It will be available in your Dashboard, in the All resources section or in the Virtual machines section:

Firewall/EC2 security groups
For recommended security settings, please refer to Requirements.
Ports access is configured in a security group that contains all the firewall rules. To edit those rules:
- Go to Network & Security > Security groups.
- Select the security group associated with your virtual device.
- From tabs Inbound or Outbound, click Edit.
- Edit rules according to your needs.
By default, all incoming traffic from outside a network is blocked. To access the instance from outside, you need to change or add a series of firewall rules:
- From GCP dashboard, go to VPC network > Firewall
- Add or edit your rules to match the Network Security Settings requirements.
ADB connections are neither secured nor authenticated; you should ONLY allow TCP port 5555 from authorized hosts!
In the Public IP Address section, check Assign Public IPv4 Address to assign a public IP to your instance. Please note that without a public IP, your instance will not be reachable outside of Alicloud VPC!
In Secrity Group, select the custom Security Group you want to use. If you already have Security Groups, click Select Security Group.
Otherwise, select the New Security Group tab to create a new group. You can create a Basic Security Group with SSH, HTTPS and HTTP for basic access. Or you can use an Advanced Security Group for more refined security settings.
You can only add basic access (SSH, HTTPS, HTTP) at this point. You may need to edit your security Group later to refine your security or add more rules, such as ADB access
For details about security settings, please refer to the Requirements section.
Ports access is configured in Network security groups (NSG). NSGs are usually defined during a virtual machine setup and Network Security Groups but can also be changed afterwards:
- Go to Network security groups.
- Select the NSG associated with your virtual machine (
your_virtual_machine_name.nsg). - Edit or add rules according to your needs and the required network settings in Inbound security rules and Outbound security rules.
Deployed resources
Once done, an instance with the following resources will be deployed and started:
- AMI: The Genymotion Amazon Machine Image (AMI) you subscribed to. AMI Information contains the Genymotion and Android versions.
- Security group: The EC2 security group of the instance.
- Network interface: The EC2 network interface attached to the instance.
- Storage: The Elastic Block Store (EBS) volume(s) attached to the instance.
User Data
- User Data is located in the
/datapartition. -
Data is encrypted using Android encryption with Android 8.0 images and above.
There is no data encryption with Android 7.0, 6.0 and 5.1 images!